Twitch is a live-streaming platform for gamers and fans of other things. However, there have been a lot of debates recently about Twitch’s “Go Live” notification settings on Twitch. If your Twitch notifications aren’t working, this post will show you how to get them working again.
Live streamers rely on notification settings on Twitch to be sent to their followers each time they go live; otherwise, they’ll have to share the same information on Twitter or Facebook. However, many Twitch users have complained about not receiving notifications in a timely manner.
Streamers, on the other hand, have discovered that they do not receive a large enough audience every time they go live. So, what exactly is the issue here? It turns out that there could be several reasons why your notification settings on Twitch aren’t working.
Twitch has a variety of notification settings on Twitch, and you may modify your notification settings ahead of time to prevent getting notifications you don’t want to receive. In your account settings, you’ll find notification settings. To get to them, go to the top-right corner of your profile and click “Settings.”
How do I change the notification settings on Twitch?

Go to Twitch’s official website. If you haven’t already, click the button in the upper-right corner of the browser window to log in.
- Click the profile icon in the same corner.
- From the drop-down box, choose Settings.
- Select the notification settings on Twitch tab from the Settings menu.
You’ll notice many options in the middle of the window: on Twitch, by Email, on Mobile, and per Channel. To expand an entry’s options menu, click the down arrow on the right side of the entry. The toggle switches next to the entries can be turned on and off to turn notifications on and off for them once you’ve chosen a menu to open.
How to Turn Off Twitch Emails for a Streamer
Do you want to opt out of receiving notification settings on Twitch from only one streamer? If the notifications that tell you when one of the streamers you follow is life disturbing you, you can turn them off individually. You won’t need to disable any additional notification settings on Twitch in that situation.
- Go to the channel page of the streamer.
- Click the arrow next to the heart that says “follow.”
- To turn off notifications for that streamer’s live, click the toggle button.
Stopping Twitch emails from one streamer’s account is the easiest way to keep getting the other notifications you want while avoiding the ones that irritate you.
This can also be useful if a certain streamer goes live too frequently and the emails get overwhelming.
How to Stop Receiving Twitch Emails in Gmail
From your Gmail account, you can turn off all Twitch email notifications. To block a Twitch email, simply open it and select “Block” from the menu (in the upper right corner). The next time you get an email from Twitch, you can choose to move it to your spam email folder instead of your inbox.
How to Stop Receiving Twitch Emails in Outlook
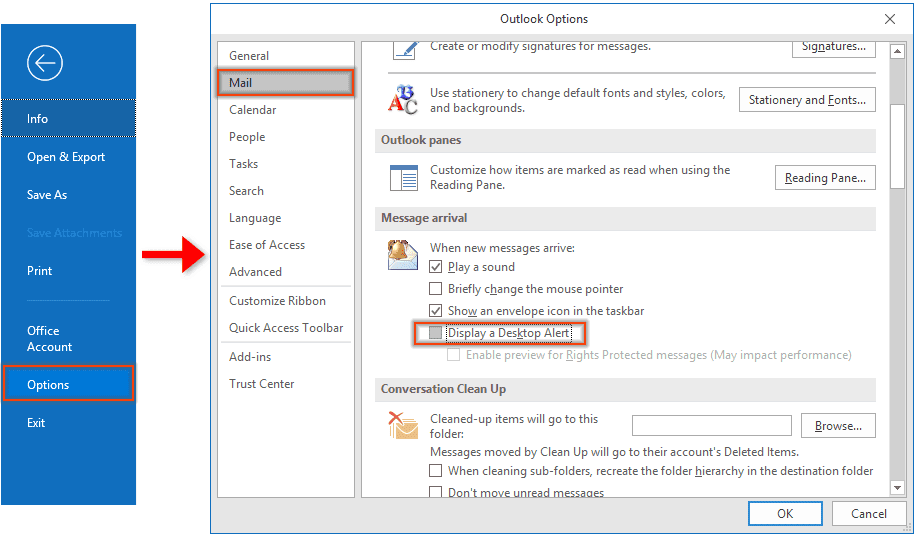
Users of Outlook may also ban Twitch emails. Here’s how:
- In your Outlook account, choose a Twitch message.
- In the toolbar, select “Junk.”
- “Block” should be selected.
- Choose OK.
- You can now rest assured that any emails you get from Twitch will end up in your junk or spam folder.
- You can delete all of the messages you’ve already received, as well as stop receiving new ones in the future.
- Select the “Move all messages from the Inbox folder and any future messages” option from the Sweep icon.
How do I enable Twitch notifications?
1. Use a different browser
- Changing your browser may help you fix this issue.
- To change your settings on Twitch, try logging in with a different browser.
- You can use any browser, but because of its privacy-focused features, we prefer the UR Browser.
This browser is similar to Chrome, but it has better tracking, phishing, and malware protection than Chrome. If you need a safe browser, give Opera GX a try.
Because of Opera’s GX’s outstanding gameplay features, you can have an experience that is superior to what other browsers provide.
You can customize the browser with your favorite wallpaper and color scheme. Furthermore, Opera GX has an ad blocker built-in, which can help keep annoying ads from interfering with your game.
In terms of privacy, the browser includes a free, built-in VPN with unlimited bandwidth.
2. Notifications on Twitch Live aren’t working
On Twitch, enable live notification settings on Twitch.
- In your browser, go to Twitch.
- Open Settings by clicking on your avatar in the top right corner.
- Choose Twitch from the Notifications menu.
- Check to see if live notifications are turned on.
- You might also try disabling the Smart Notification option.
- Return to Settings and enable live notifications in the browser.
- Select Notifications from the dropdown menu.
Turn on Receive Browser notification settings on Twitch for this device in the Receive Browser Notifications for this Device section. Allow the prompt to display when it appears.
3. Notifications from Twitch aren’t working
- Install the app again.
- Type “control” into the Windows Search bar to open the Control Panel.
- Uninstalling software is the option.
- Remove the Twitch app from your device.
- Twitch is available for download and installation.
- Sign in to the app and check that all notifications are turned on.
- Make sure that Smart Notifications are turned off.
- Twitch is now open.
- Select your preferences.
- Select Notifications from the dropdown menu.
- Turn off the smart notifications.
How to customize your notification settings
Switch to the “Notifications” tab once you’re in the settings. The first option is “Smart notifications,” which means Twitch will verify if you have an active session and send you a notification to that device rather than send a notification to all enabled devices if you leave this setting enabled.
- The notification settings on Twitch are divided into three categories: “On Twitch,” “By Email,” and “On Mobile.”
- “On Twitch” is a command that allows you to control the notifications that you receive on a Twitch browser tab.
- The setting “By Email” is used to limit the kinds of notifications that can be sent to your email account.
- The setting “On Mobile” determines which notifications are transmitted to your smartphone.
Although the options for each platform are the same, each of the three device types can be configured to receive separate sets of notifications.
“Per Channel” is where you can choose which channels you follow or subscribe to send you notifications. To turn off notifications from a specific channel, move the slider to the “Off” position.
You can choose to receive notification settings on Twitch when a channel you follow goes live when a channel you follow begins rebroadcasting an old stream, or when a clip from your channel or one you created becomes popular.
You can also choose to receive notifications when a live event you’re watching is about to begin, when you’re referenced in a chat room when a friend sends you a “Whisper,” or when someone follows your Twitch account.
Official messages provided to content creators, notifications notifying you that a discussion you moderate requires your attention, and special offers on drops, crates, or if you receive a gifted membership are all examples of administration notifications. You may also set up notifications for developers, new channel recommendations based on your favorite channels, when a subscribed channel has an update, and Twitch marketing and promotion messages.
You can turn off all notification settings on Twitch for each device by moving the “All notifications on Twitch,” “All emails,” or “All push notifications” sliders to the “Off” position at the top of the list. You can activate browser notifications in the “On Twitch” notification settings by selecting “Turn On” at the bottom of the list.