
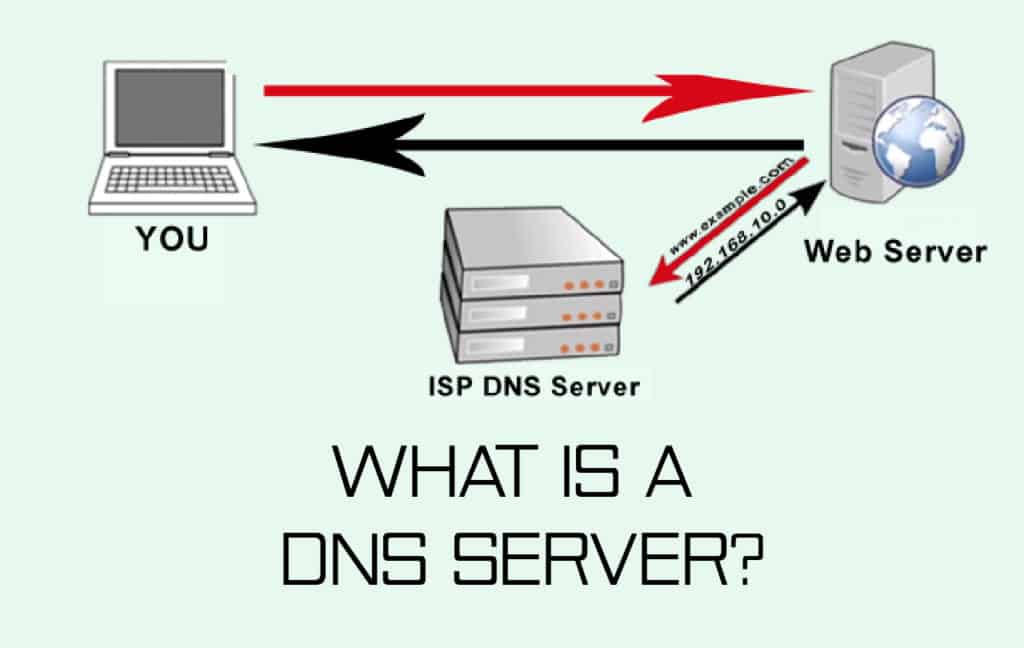
All of the domain names for the sites you’ve visited are stored on the Domain Name System (DNS) server. When you search for a domain name in a web browser, your router sends the request to a DNS server unavailable. It then returns the relevant IP address if the domain name of the given site has been stored. As a result, the loading time for certain sites is significantly reduced.
Despite how effective this procedure is, the DNS server unavailable will occasionally fail to establish a connection. When you try to troubleshoot your web browser in this situation, you’ll almost always get a “DNS server unavailable” message. The appearance of this error on your screen could be due to a variety of circumstances.
The most obvious of these is the chance that the server is currently down. Fortunately, this issue is frequently accompanied by a few simple fixes DNS server unavailable.
How to Resolve the Error “DNS Server Unavailable”
Have you ever gotten an error message stating that the DNS server unavailable? These issues can sometimes be resolved quickly by changing browsers, fiddling with a few firewall settings, or rebooting your router. It’ll be up to you to figure out what’s causing the problem and how to fix DNS server unavailable.
To begin, open the web pages you’re trying to open in a different browser. This means that if you’re getting the issue while using Mozilla Firefox, you should switch to Microsoft Edge or Google Chrome. We can move on to testing additional devices if the problem persists.
To rule out the possibility of hardware issues, try opening a webpage on a mobile device connected to the same network. It’s also a good idea to try connecting to the same webpages using your data plan to see if the problem is caused by the DNS server. Reboot your router once you’ve completed these procedures. If the error “DNS server unavailable” persists, we’ll need to try a couple more effective approaches.
Cleaning up your DNS (Windows)
The most efficient way to fix the DNS server unavailable is to use the Command Prompt to flush it.
- By pressing the Windows key and the R key at the same time, the “Run” dialogue will appear.
- Press Enter after typing cmd into the slot.
- In the Command Prompt window, type ipconfig / flushdns and press Enter.
- After that, type ipconfig/release and hit Enter.
- Finally, hit Enter after typing ipconfig/renew.
- Restart your computer after closing the Command Prompt window.
- Cleaning up your DNS (MacOS)
On a Mac, you can also flush the DNS.
Depending on the version of Mac your machine is running, the way you do this will differ slightly. Frequently, all that is required is to change the syntax used during the procedure. To get started, open a Finder window and go to Applications, then Utilities, and finally Terminal.
Enter the appropriate syntax, based on the MacOS version you’re currently running:
sudo dscacheutil-flushcache; sudo killall-HUP mDNSResponder; say cache flushed; MacOS X El Capitan/Yosemite – sudo dscacheutil-flushcache; sudo killall-HUP mDNSResponder; say cache flushed;
- Return to the previous screen, type your password, and then return to the previous screen.
- Before exiting the terminal, listen for the audio indication that indicates a successful DNS flush.
- To thoroughly flush out the MacOS X cache, you’ll need to take a few further actions.
- On top of the previous steps, you’ll need to flush the MDNS and UDNS caches.
- Perform the following commands before exiting the terminal:
- Type sudo discoveryutil mdnsflushcache to flush the MDNS cache.
- Type sudo discoveryutil udnsflushcaches to flush the UDNS cache.
- Multiple antiviruses should be removed.
- “There’s no such thing as too much security.”
While this may be true in the real world, having many antivirus products installed on the same computer can actually reduce the level of security provided.
Check to see whether you have two or more antivirus products active at the same time, as this could be the source of the DNS server unavailable problem. After you’ve disabled all other apps, reboot your computer, and the problem should go away.
To help guard yourself against unwanted virus attacks, make sure you only run one software programme at a time in the future. This not only improves security, but it may also help you prevent additional DNS server unavailable.
DNS Server Changes
If you’ve tried all of the solutions listed here and are still getting the “DNS server unavailable” issue, it might be time to change your DNS servers.
There are many public DNS servers to select from, with Google’s free DNS being one of the most popular. Depending on where you want to update it, the process is quite straightforward and can be completed in a few clicks.
In each of our examples, we’ll use the Windows operating system.
Router-based DNS changes
Launch your web browser and type the default gateway address into the URL bar to gain access to your router.
By opening a command prompt window and typing ipconfig and clicking Enter, you can find the default gateway. In the pulled-up information, copy the numbers next to Default Gateway.

Use the correct credentials to log in to the router.
- Locate your internet account information, which is usually available in a tab with a similar name.
- Go to the DNS server and choose the option that best matches the internet protocol you’re using (IPv4 or IPv6).
- In place of the current DNS server, type the IP of the DNS server you want to use.
- The primary DNSv4 server for Google will be 8.8.8.8, and the alternate DNS server will be 8.8.4.4.
- In the case of IPv6, the addresses 2001:4860:4860:8888 and 2001:4860:4860:8844 should be used.
- Exit the router interface after saving the edited data.
DNS Modifications on the Windows Operating System
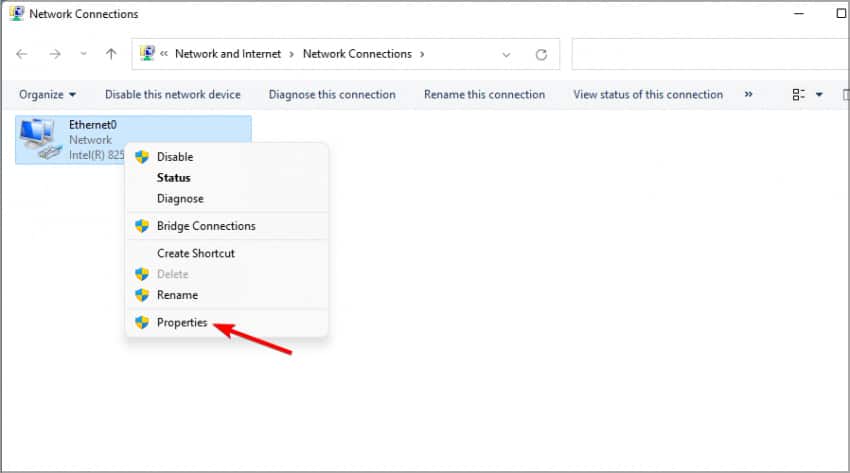
Launch the Run function (Windows key + R) and type ncpa.cpl to access your network connection properties.
Enter the code
Users of Windows 10 can access the Network Connections menu by right-clicking the Windows icon in the lower left corner of the desktop screen.
Choose the network adapter that is currently active
WLAN stands for wireless connections, while LAN stands for direct connections, which are commonly made using an Ethernet cable.
- Your options will be on the left side panel in Windows 10.
- Change adapter choices from the main window after selecting one.
- Select Properties from the context menu when you right-click your selection.
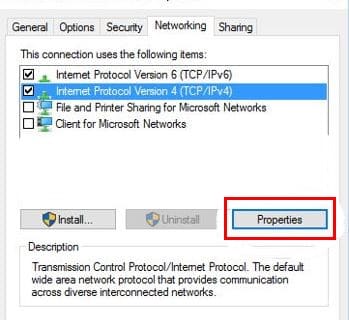
- Select your IP version (v4 or v6) from the menu and click the Properties button on the Networking tab.
For more information, click the radial
To activate editing capabilities, use the following DNS server unavailable addresses:
Input the DNS server addresses that you intend to use
If you were previously using a DNS server that wasn’t obtained automatically, make a note of the addresses in case you want to use them again in the future.
- Click OK to complete the changes.
- A new DNS server is being tested.
Open a browser and try to launch a well-known site like www.google.com once the DNS servers have been updated.
If the site can be accessed right away, the new DNS is working successfully. If not, type in one of Google’s IP addresses, 172.217.16.195, into your browser’s address bar and press Enter.
Keep your eyes peeled for the Google logo and search bar to emerge. If this also fails, the issue may be with the internet rather than the DNS server. If this is the case, contact your internet service provider for assistance.