
Do you know the best way to enable or disable hibernation in windows 10? Have you ever needed to leave your computer for an extended period of time but didn’t want to turn it off? This could be for a variety of reasons; perhaps you have some work to get back to after your lunch break, or your computer boots up slowly.
That’s exactly what Windows OS’s sleep mode allows you to accomplish, but what if I told you there’s a better power-saving function than sleep mode? Hibernation mode is a power-saving feature that allows Windows users to take advantage of the benefits of both a complete system shutdown and a sleep mode.
Users can set when their systems fall into enable or disable hibernation, just like they can with Sleep, and the capability can be turned off totally if desired (although keeping it active does make for a better overall experience). We’ll discuss the differences between enable or disable hibernation modes in this article, as well as how to enable or disable hibernation on Windows 10.
What is the definition of hibernation?
Hibernation is a power-saving mode designed especially for laptops, but it is also available on some desktop computers. In terms of power utilization and where you are currently open (before you left your system), files are saved, it differs from sleep. When you leave your computer on without turning it off, the sleep mode is activated by default.
The screen is switched off in the sleep state, and all foreground processes (files and apps) are kept in memory (RAM). This allows the system to run in a low-power mode while remaining operational. With a single click of the keyboard or a simple mouse movement, you can return to work. Within a few seconds, the screen will come back to life, and all of your files and applications will be in the same state as when you left.
Hibernation is similar to Sleep in that it saves the status of your files and applications and is activated after your system has been asleep for a long time. Hibernation does not require any power, unlike Sleep, which saves files in RAM and so requires a steady power supply (like when your System is shut down). This is possible because the present state of the files is stored on the hard drive rather than in temporary memory.
When you go to sleep for a long time, your computer saves the status of your files on the hard disc drive and goes into hibernation mode. Because the data have been relocated to the hard disc, the System will take a little longer than Sleep to boot up. Although launching your computer after a complete shutdown is still faster, the boot on time is still faster.
Hibernation is especially handy when the user does not want to lose the status of his or her files but will not be able to charge the laptop for an extended period of time. As is clear, storing the status of your files necessitates reserving some memory, which is taken up by a system file (hiberfil.sys). The amount set aside is generally equal to 75% of the system’s RAM.
For example, if your system has 8 GB of RAM, the hibernation system file will need about 6 GB of hard disc space. We’ll need to check if the PC contains the hiberfil.sys file before we can enable hibernation. The computer will not be able to go into enable or disable hibernation if you are not present (PCs with InstantGo do not have the hibernation power option).
Follow the steps below to see if your machine can hibernate:
1. Open File Explorer by double-clicking its icon on the desktop or by hitting Windows Key + E on the keyboard.
To open the C drive, click on Local Drive (C:).
2. Go to the View tab and then click Options at the bottom of the ribbon.
“Change folder and search options” should be selected.
3. Switch back to the Folder Options window’s View tab.
4. To enable “Show hidden files, folders, or drives,” double-click on “Hidden files and folders” to access a sub-menu.
5. Check or uncheck the box next to “Hide protected operating system files (Recommended)”.
When you try to untick the option, a warning notice will appear.
To confirm your action, click “Yes.”
6. To save your changes, click Apply and then OK.
7. If present, the hibernation file (hiberfil.sys) is located at the root of the C drive.
This indicates that your machine is capable of enable or disable hibernation.
How do you enable or disable hibernation On Windows 10?
Enable or disable hibernation with ease, and both actions can be completed in a matter of minutes. Hibernation can also be enabled or disabled using a variety of means. The simplest technique is to use an elevated command prompt to run a single command, while other methods include using the Windows Registry Editor or accessing advanced power options.
Use the Command Prompt to enable or disable hibernation.
As previously said, this is the simplest technique for enable or disable hibernation in Windows 10 and should be the first method you try.
1. Use any of the methods given to open the Command Prompt as an administrator.
2. To enable Hibernation, type powercfg.exe/hibernate on and press Enter.
To disable hibernation, enter powercfg.exe/hibernate off and press Enter.
Both commands provide no output, so you’ll have to go back to the C drive and look for the hiberfil.sys file to see if the command you entered was properly executed (Steps are mentioned earlier). If you discover the hiberfil.sys file, it means hibernation was enabled successfully. Hibernation, on the other hand, is inhibited if the file is missing.
Use the Registry Editor to enable or disable hibernation.
The user edits the Hibernate Enabled entry in the Registry Editor in a second way. When using the Registry Editor, be cautious because it is a very powerful tool, and any accidental misstep might result in a whole new set of issues.

1. Open the Windows Registry Editor with one of the techniques listed below.
- Hit Windows Key + R to open the Run command, then type “regedit,” and press Enter.
- Press Windows Key + S, type Regedit or registry editor, and when the search results appear, click “Open.”
2. Double-click or click on the arrow to the left of HKEY LOCAL MACHINE in the registry editor window’s left panel to expand it.
3. Double-click “SYSTEM” in HKEY LOCAL MACHINE to expand it.
4. Now, open CurrentControlSet and expand it.
Navigate to Control/Power using the same pattern. In the address bar, the final destination should be:
- HKEY_LOCAL_MACHINESYSTEM
- CurrentControlSetControlPower
5. In the right-hand panel, double-click HibernateEnabled or right-click it and select Modify.
6. In the Value Data text box, input 1 to enable Hibernation.
Type 0 in the Value Data text box to disable hibernation.
7. When you’re finished, click OK to close the registry editor and restart your computer.
Return to the C drive and check the hiberfil.sys file to see if you were successful in enable or disable hibernation.
Method 3: Enable or Disable hibernation via Advanced Power Options
The fourth method involves using the Advanced Power Options panel to enable or disable Hibernation. Users can also specify a time frame after which their system should go into hibernation. This method, like the others, is straightforward.
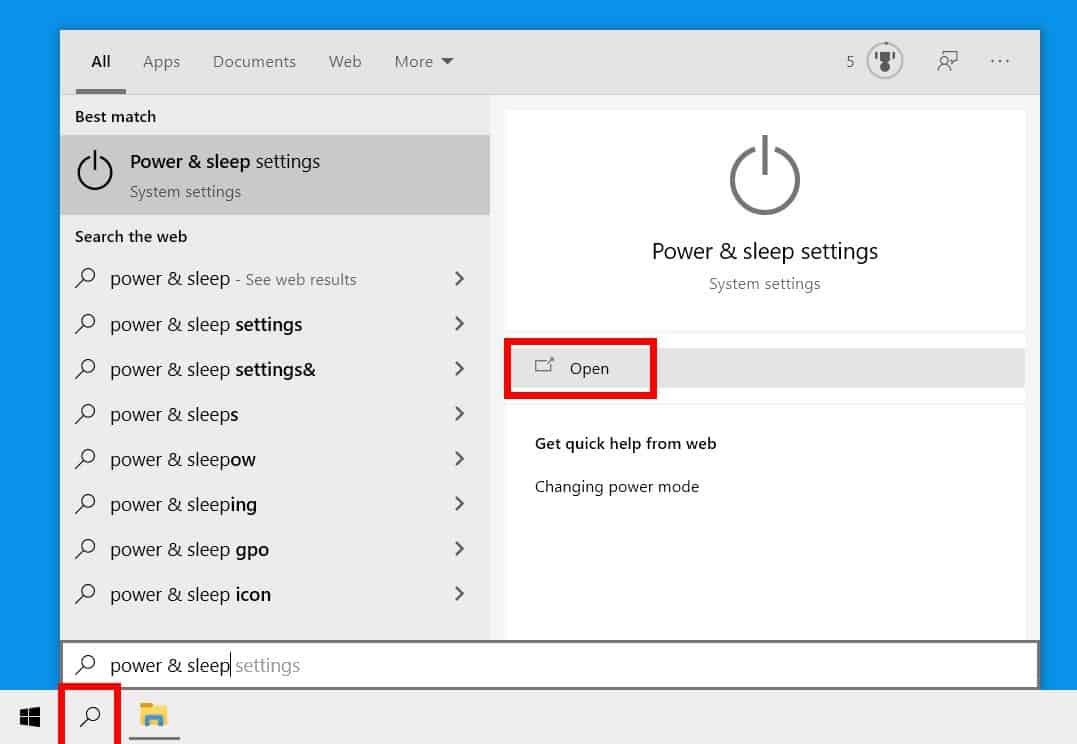
1. Select one of the two methods for gaining access to Advanced Power Options.
- In the Run command, type powercfg.cpl and press Enter.
- Click “System” in Windows Settings (Windows Key + I).
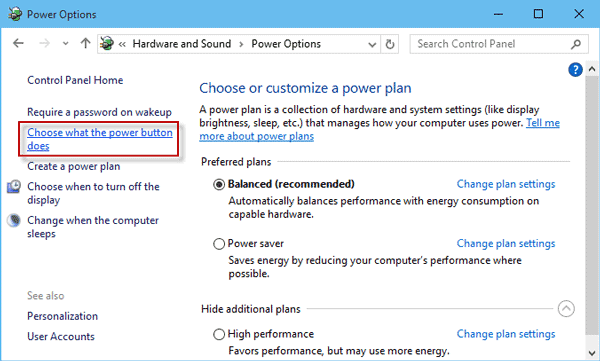
Select additional power settings from the Power & Sleep settings menu.
2. In the Power Options box, under the Selected plan section, click Change plan settings (highlighted in blue).
3. In the Edit Plan Settings window that appears, click Change Advanced Power Settings.
4. Click the + sign to the left of Sleep or double-click the label to expand it.
5. After that, double-click Hibernate and set the Settings (Minutes) to the number of minutes you want your system to sit inactive before entering into Hibernation.
Set the Settings (Minute) to Never and the Allow Hybrid Sleep setting to Off to disable Hibernation.
6. To save the changes you made, click Apply, then OK.
We hope you were able to enable or disable hibernation in Windows 10 successfully. Also, let us know which of the three approaches listed above worked best for you.